Real Strawberry Shortcake {ModBak}

We’ve been getting some beautiful strawberries this year and using them as many ways as we can. We’ve eaten them whole, sliced, and macerated, and I’ve made a number of desserts featuring fresh strawberries. There are a number of recipes I would like to remember for future years, so, I’ve declared this week “Strawberry Week” on my blog and invited my blogging friends to join in.

Two recipes I made (and the base for a third) happen to be from the Cakes section of the Modern Baker Challenge, including this one for a simple, classic strawberry shortcake. As with most strawberry shortcakes, this recipe consists of three components: shortcakes, macerated strawberries, and whipped cream.

For the strawberries, I hulled, washed, and sliced them, then mixed them with sugar (it didn’t take much, as these were height-of-the-season, super sweet strawberries). I set them aside to macerate while I made the shortcakes.

I began by mixing flour, sugar, baking powder, and salt in the bowl of my food processor. I added cold butter and pulsed until it was finely mixed in.

I whisked egg and buttermilk together, added them to the food processor, and mixed until I had a soft, wet dough.

The recipe presents two options for the shortcake. It can be made as a single cake in an 8-inch round pan, or baked as individual shortcakes by mounding the dough on a baking sheet. I opted for individual shortcakes.

I baked the shortcakes for about 15 minutes, until they were firm and lightly browned.

While the shortcakes were baking, I whipped heavy cream, sugar, and vanilla extract with the stand mixer.

After the shortcakes had cooled enough to handle, I cut them in half, buttered them, and assembled the shortcakes.

Each shortcake consisted of a buttered shortcake half, topped with strawberries and whipped cream, and finished with the remaining shortcake half.

If strawberries are the perfect fruit, then these may be the perfect dessert. The shortcakes and whipped cream accent the strawberry flavor without overshadowing it. And did I mention that start to finish this recipe takes less than an hour to prepare?

This was a great recipe to highlight fresh strawberries, and a great way to kick off Strawberry Week. Here’s what’s in store for the rest of the week:

Hungarian Shortbread {TWD-BWJ}

This week’s recipe for Tuesdays with Dorie — Baking with Julia was a new twist on an old favorite for me. I’m a big fan of shortbread cookies and love to try different versions of them (Nick Malgieri’s macadamia shortbreads were especially delicious), but I had never heard of Hungarian shortbread before making this recipe.

What sets Hungarian shortbread apart from other shortbreads is that it is layered and filled with a tart fruit filling, rhubarb jam in the case of Dorie’s recipe. The other thing that is unique about this recipe is the way the shortbread is formed. After mixing the dough, you divide it in half and shape each half into a ball, freeze the dough balls for half an hour, then grate the dough into the pan using a box grater. The filling is spread between two layers of dough, and the whole thing is baked. Finally, the shortbread is dusted with powdered sugar as soon as it comes out of the oven.

Here are my observations on this recipe:

  • I don’t really understand the purpose of freezing and grating the dough.  The recipe says that it makes the dough easier to work with, but I didn’t really find that to be true. First, I had a heck of a time shaping the dough into balls and wrapping it. Then, when I tried to grate it, it got so crumbly that I gave up on the box grater and  just crumbled it into the pan by hand. I think it would have been just as easy to press the dough into the pan from the beginning, and that’s what I’ll do next time.

  •  I’m generally not a fan of rhubarb, and it’s not really in season here yet, so I decided to use my homemade four-citrus marmalade for the filling. The tart bite of the marmalade offset the sweetness of the shortbread and brought the whole thing together.

  • The shortbread baked up beautifully. Some of the other TWD bakers reported that their shortbread came out underdone, but mine was perfect.

  • I dusted the top of the shortbread with powdered sugar as soon as it came out of the oven, as the recipe instructed. However, since it was hot, the sugar melted and got kind of funky. Next time, I’ll let it cool first, then dust on the sugar.

  • And now, a word about purple. When I first looked at the picture of the finished shortbread in the book, I thought it was beautiful. I especially liked the contrasting colors — the golden shortbread punctuated by the red filling and bluish-purple topping. I quickly turned to the recipe to see what made the bluish color on top of the shortbread, but the recipe just said to dust it with powdered sugar. Nothing blue; nothing purple — just powdered sugar. I flipped back to the picture, looked at it more closely, and realized the blue tint was just a reflection from the background. Undaunted, I decided mine would be purple.
  • I tried coloring the powdered sugar with food coloring, but it didn’t mix in. Then I stirred in purple finishing sugar that I use for King Cake. It mixed in fine, but when I dusted the top of the shortbread, the colored sugar didn’t make it through the sifter. I finally ended up just sprinkling the sugar on top of the shortbread. It didn’t give quite the same effect as the photo in the book, but I still liked the look of it.

The final verdict: we really liked this recipe, and I’ll definitely be making it again. I might change up the filling, but I’ll keep it tart. And I won’t bother with trying to grate the dough; I’ll just press it into the pan. And, yes, I’ll use purple sprinkles again.

Tart Lime Wafers {ModBak}

This week’s recipe for the Modern Baker Challenge is a great make-ahead cookie. The dough is formed into rolls, which can be refrigerated or frozen until you are ready to slice and bake them. Kind of like the cookie dough you see in tubes in the dairy case, but without all the nasty preservatives.

The dough is mixed up in the food processor, and I could tell by reading the ingredient list that it was going to be a lot. I’m pretty sure Nick Malgieri must have a 14-cup food processor, because several of his recipes have filled by 11-cupper to the brim. I thought about cutting the recipe in half, but I really wanted that extra roll of dough to freeze, so I went with the full recipe.

I started by mixing flour, sugar, salt, and lots of lime zest in the food pro, then adding 3 sticks(!) of butter.

Next I added eggs, then mixed until the dough formed into a ball.

I had to stop and scrape the dough down into the bowl a few times, but eventually it came together.

I scraped the dough out onto a floured pastry mat, divided it in half, then shaped each piece into an 8-inch cylinder.

The next step is to roll the cylinders in lime sugar, which I made using lime zest and King Arthur Flour sparkling white sugar.

I spread the lime sugar out on the pasty mat and rolled each log until it was well coated.

I had a lot of lime sugar left over, so I packed it up and stashed it in the freezer. I’m not sure what I’ll use it for, but coating the rim of a mojito glass comes to mind.

Nick gives great instructions for tightening up the dough cylinders using parchment paper and a dough scraper. Mine went from the loose logs you see above to this:

I wrapped the cylinders in plastic wrap and stuck one in the fridge to bake the next day and the other in the freezer for later use.

To bake the cookies, I sliced the dough into thin disks and placed them on a parchment-lined cookie sheet. I baked the cookies at 350°F for about 15 minutes, until they were slightly puffed and just starting to brown around the edges.

These cookies were a huge hit around my house. Sweet, tart, buttery, crispy — they reminded me a lot of a shortbread cookie. And they were perfect for dunking in tea or coffee.

This is definitely a recipe to repeat. And it makes a generous amount of dough, so you can bake one roll and freeze the other for later. Re-roll the dough in the leftover sugar, slice, and bake, and you can have these fresh, delicious cookies anytime.

Macadamia Shortbreads {ModBak}

I was hopeful that this week’s Modern Baker Challenge cookie would make up for the tuile disaster and the fussy thumbprint cookies. Since it’s a shortbread, I knew it would at least be fairly easy, without a lot of ingredients. And the addition of macadamia nuts seemed like it would elevate the cookies a bit, both in style and flavor.

A classic Scottish shortbread recipe uses three ingredients: butter, sugar, and flour. This recipe adds baking powder and, of course, macadamia nuts to the trinity, but otherwise stays true to its Scottish roots.

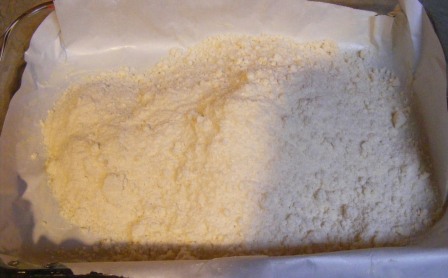
After grinding the macadamias with sugar in the food processor, I added the flour, baking powder, and butter and whirred it together until it made a fine, powdery mixture.

When I dumped it into the pan, it was hard to envision how this sandy, silty substance would pull together into a cookie.

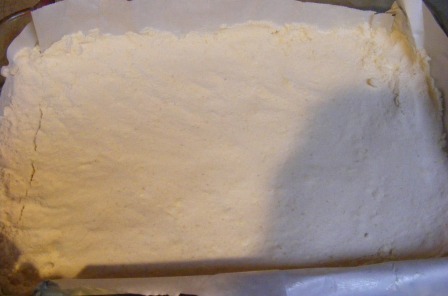
Of course, that’s the beauty of shortbreads. Since the only liquid in the recipe is butter, and it starts in its solid state, the dough really comes together once it hits the heat. In the meantime, I pressed the dough into the pan as best I could.

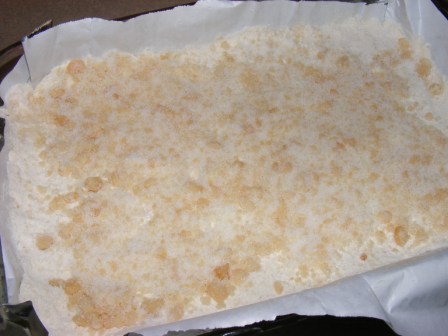
I sprinkled the dough with a little water, then topped it with macadamia nuts ground with sugar.

The shortbreads baked up beautifully. They smelled so rich and buttery, I couldn’t wait to try them.

And the flavor did not disappoint. Macadamia nuts have a buttery richness to them that paired perfectly with the shortbread dough. In fact, it’s such a natural combination, I’m surprised I’ve never heard of it before.

The cookies kept well in a plastic container, and we enjoyed them for several days. In case you’re wondering where the picture of the finished cookies went, you’ll have to ask him…

I realized I hadn’t plated the cookies for a picture, and went to get them, but they weren’t on the counter where I had left them. I looked all over the kitchen and dining room, but to no avail. I never found the cookies, but I did find the container under my daughter’s bed, where Bailey likes to take his purloined treasures.

Stupid dog.

But at least he has good taste.

Sour Cream Brownies & Caramel Crumb Bars {ModBak}

Today, we bring you a Modern Baker Challenge two-fer. One thing that I love about baking cookies, brownies, and bars is that it’s almost as easy to make two recipes as it is to just make one. In fact, growing up I don’t ever recall my Mom making just one type of cookie when she baked. And she still makes them in multiples to this day, as evidenced by the fact that she often shows up here with bags of Snickerdoodles, chocolate chips, and peanut butter cookies.

So it was not at all unusual for me to decide to bake Sour Cream Brownies and Caramel Crumb Bars from the Cookies, Bars & Biscotti section of The Modern Baker on the same day. In fact, I’ve baked a number of the cookie recipes in this section this way, even though I’ve blogged them separately. But there was just something about the way these two looked on a plate together that made me decide they wanted to be in the same post.

I started with the Sour Cream Brownies. Like the Cocoa Nib Brownies, these babies are loaded with bittersweet chocolate. Nick Malgieri says that the inclusion of the sour cream cuts back the sweetness just a bit and keeps the brownies moist, and I’d have to agree. These brownies are very rich, but not cloying; and they are moist and fudgy, even after a day or so in the fridge.

If you’ve ever struggled with melting chocolate over a pan of simmering water while holding a bowl and trying not burn your fingers, or attempted to melt it in the microwave without burning it, you’ll appreciate Nick’s technique for melting the chocolate in this recipe. I melted the 6 ounces of butter called for in the recipe in a saucepan and let it bubble for a few seconds. Then I removed the pan from the heat, dropped in the chocolate chunks, and shook the pan to submerge the chocolate in the hot butter. By the time I had mixed the brown sugar, eggs, sour cream, salt, and vanilla in the mixer, the chocolate was melted and ready to be whisked into the butter.

I stirred the chocolate mixture, and then the flour and walnuts, into the mixing bowl with a rubber spatula — another trick I learned from Nick. Overmixing the batter results in tough brownies and fallen cookies, so he recommends mixing in the last few ingredients, including the flour, by hand.

I spread the batter in the pan, smoothed the top, and sprinkled it with a few more walnuts.

I baked the brownies at 350°F for 30 minutes, and not a second more. They still looked very moist in the center, but that’s exactly how the recipe said they should look.

I set the brownies aside to cool. Cutting them would have to wait a day, as Nick also recommends refrigerating brownies overnight. This makes moist brownies like these easier to cut and intensifies the chocolate flavor.

While the brownies were baking, I mixed up the Caramel Crumb Bars. These bars are Nick’s favorite cookie, and I can see why. They consist of three layers — a buttery dough, caramel filling, and crumb topping. And yet they are surprisingly easy to make.

I began by mixing the dough in the mixer. It was made of butter, sugar, salt, vanilla extract, and flour, all mixed together to a soft, silky texture reminiscent of Scottish shortbread dough. I pressed 3/4 of the dough into the pan for the bottom crust. I put the pan in the refrigerator to chill and added a bit more flour to the remaining dough to make the crumb topping.

The next step was to make the caramel. Despite my previous issues with making caramel for semolina cake and pineapple tatin, I have since had better success with caramel, so I felt pretty good about making the filling for these bars. Besides, this caramel started with sweetened, condensed milk and light corn syrup, so I was halfway home before I ever began.

I put the milk and corn syrup into a pan with butter and dark brown sugar. I brought it to a low boil, then let it simmer for about 10 minutes, until the caramel was thick and had taken on just a little bit of color. I set the caramel aside to cool for a few minutes before assembling the bars.

I spread the caramel over the chilled dough, then sprinkled the crumbs on top.

By this time the brownies were finished baking, so I put the caramel bars into the oven, which was still set at 350°F. I baked the bars for 30 minutes, until the filling was a deep, caramel color and the topping had baked through.

I cooled the bars in the pan for about 20 minutes, then cut them. Because of the thick, gooey caramel, these bars are easier to cut when still slightly warm. And although the recipe says to cool them to room temperature before serving, I can attest that they are delicious when they are still a bit warm.

I can easily see why the caramel crumb bars are Nick’s favorites. The sweet, creamy caramel filling is out of this world, and it pairs nicely with the soft, buttery, slightly chewy crust. And of course, crumb topping goes well with almost any sweet. These are definitely on the repeat list. In fact, just writing this post has me thinking about making them to take to work tomorrow.

The brownies came out of the fridge moist and chewy. They were rich, dense, and oh-so-chocolatey. And of course, walnuts are a classic addition to brownies and gave these a nice crunch.

Having made a number of Nick’s brownie recipes, I am convinced that using real chocolate, rather than cocoa or chocolate chips, is the way to go for rich, moist brownies. The only thing I’m not sure of is whether I liked these brownies or the cocoa nibs ones better. I’ll probably have to make both of them together so I can do a side-by-side comparison. In the interest of baking science, of course.

Scottish Shortbreads {Recipe} – Virtual Cookie Exchange

It’s that time of year. Time for decorating, shopping, attending holiday parties, and, of course, COOKIES!! Like many of you, I bake a lot of cookies during the holiday season. So I was excited to once again get invited to my friend Di’s second annual Virtual Cookie Exchange.

Given the hustle and bustle of the Christmas season, I thought I would choose a really easy recipe. After looking around a bit, I settled on a Scottish Shortbread recipe by my friend and baking mentor, Nick Malgieri.

When I say these cookies are easy, I’m not kidding. There are only three ingredients — butter, sugar, and flour — and they go from mixing to the oven to baked in no time.

Since the only binder is butter, the dough is quite crumbly. But a little kneading and pressing brought it together quite nicely.

After dividing the dough, I pressed it out by hand (no rolling needed), then cut the cookies with a 2 1/2-inch fluted cutter.

The cookies baked up nice and crisp and had that wonderful, buttery shortbread flavor. As simple as it was, this was definitely a winning recipe, and one I’m sure to repeat often. And not just during the holiday season.

Nick’s recipe for Scottish Shortbread can be found here, along with a lot of other wonderful recipes. I’ve also reprinted the shortbread recipe below.

Scottish Shortbread

Makes about 40 cookies, depending on the size of the cutter used

  • 24 tablespoons (3 sticks) unsalted butter, softened
  • 3/4 cup sugar
  • 3 3/4 cups all-purpose flour (spoon flour into dry-measure cup and level off)

2 cookie sheets or jelly roll pans lined with parchment or foil

  1. Set racks in the upper and lower thirds of the oven and preheat to 350 degrees.
  2. Beat the butter and sugar in the bowl of an electric mixer with the paddle attachment on medium speed until very soft and light, about 5 minutes.
  3. Remove the bowl from the mixer and incorporate the flour by hand, using a large rubber spatula.
  4. Scrape the dough onto a lightly floured work surface and fold it over on itself 2 or 3 times to makes sure it is completely smooth. Use a knife or bench scraper to divide the dough into 4 pieces.
  5. Lightly flour the work surface and gently pat the dough with the palm of you hand until it is about 1/4-inch thick (The dough is much too soft for a rolling pin.)
  6. Run a large knife or spatula under the dough to make sure it isn’t stuck to the work surface.
  7. Use a 2 1/2- to 3-inch fluted cutter to cut out the shortbreads. Place them in the prepared pans about 1 inch apart on all sides as they are cut.
  8. Repeat with the remaining pieces of dough.
  9. After you have used all the dough, gently knead the scraps together, then press the dough and cut it again. You may continue to do so until there are no scraps left as long as you don’t use too much flour under or on the dough, which will toughen the shortbreads.
  10. Bake the cookies for about 15 minutes, or until they are light golden. Change the position of the pans from upper to lower rack and vice versa, also turning them back to front at least once during baking. If your oven gives strong bottom heat, stack 2 pans together for baking on the bottom rack to provide extra insulation against burning the shortbreads.
  11. Slide the papers from the pans to racks to cool the shortbreads.