Triple Chocolate Cake {ModBak}

A few weeks ago, I wrote about making this wonderful light and airy Cocoa Génoise.

Today’s Modern Baker Challenge post is about what I made with the génoise layer. As the name implies, this cake is chocolate on chocolate covered with chocolate. In addition to the chocolate cake, there are two versions of chocolate ganache — one used to frost the cake and the other a glaze that goes over the whole thing.

With my génoise at the ready, I began by making a moistening syrup, which consisted of water, sugar, and raspberry liqueur.

I set the syrup aside to cool while I made the ganaches.

First, the ganache for filling and spreading. While I heated cream and corn syrup on the stove, I melted bittersweet chocolate in a bowl.

I poured the cream mixture over the chocolate, mixed well, then whisked in softened butter.

Next, I made the ganache glaze, which was also made with cream, corn syrup, and chocolate, although not as much chocolate as the filling. And there was no butter in the glaze. And rather than melting the chocolate, I poured the cream mixture over the chocolate and let the heat from the cream melt the chocolate.

To assemble the cake, I cut the génoise into three layers. I put the bottom layer on a tart pan bottom and brushed it with 1/3 of the moistening syrup. I topped this with about 1/3 of the ganache filling and spread it to the edge of the cake. I repeated the layers two more times, then spread ganache frosting over the entire cake.

I refrigerated the cake for a while, then poured the ganache glaze over the top and smoothed it over the sides.

This cake was beautiful. The glaze gave it a smooth, perfectly finished look. The kind you see in a bakery and wonder, “How do they do that?”

I made this cake before my parents came for a visit so they could enjoy it with us.

This cake was amazing! It may be the best chocolate cake I’ve ever had. And my parents, with over 140 years of cake-eating experience between them, agreed that this was by far the best chocolate frosting they’ve ever tasted.

As Nick points out in the notes, this is a cake for a milestone birthday or other very special occasion. It has enough flavor and visual appeal to match up to any celebration. And even though it’s a bit of work to put together, the accolades you’ll receive make it well worth the effort.

Banana Rum Coconut Layer Cake {ModBak}

This week’s Modern Baker Challenge cake features one of my favorite flavors. No, I don’t mean dark rum (although I’m certainly not opposed to rum). I’m talking about bananas. Regular readers of my blog know about my obsession with all things pumpkin, as well as my love of apples. But I am equally enamored with bananas.

Now, that doesn’t mean I’ll eat anything that’s banana flavored. In fact, like strawberries, while I love real bananas, I really dislike “banana flavored” foods. But give me a fresh banana, or better yet a baked good made with ripe bananas, and I’m a happy man.

So this cake was right up my alley. It combines ripe bananas with rum and coconut for a delicious tropical flavor baked into a homey layer cake.

To make the cake layers, I beat butter, granulated and dark brown sugars, and vanilla until fluffy, then added eggs. I mixed flour, baking powder, baking soda, and salt in one bowl and mashed bananas, milk, and dark rum in another. I alternated adding these to the butter mixture, beginning and ending with the dry ingredients.

I beat the batter for several minutes to lighten it, then divided it between two 9-inch pans. I baked the cake layers in a 350°F oven for about 25 minutes, until the cake was well risen, golden, and firm in the center.

This cake smelled good enough to eat right out of the oven. But I resisted and cooled the layers while I made the frosting.

As I’ve baked my way through the Cakes section of  The Modern Baker, I have really come to appreciate the simplicity, lightness, and wonderful flavor of whipped cream as cake frosting. And when you add rum to the whipped cream, well, things can only get better.

Having cooled the layers and made the frosting, which consisted of whipping cream, sugar, and dark rum, I was ready to assemble the cake. I placed the first layer on a cake plate, sprinkled it with about a tablespoon of dark rum, and spread the top with whipped cream. I inverted the second layer on top of the first and topped it with rum and whipped cream. I spread the frosting over the top and sides of the cake, then pressed coconut into the frosting.

We enjoyed this cake for dessert, and everyone asked for seconds.

This cake was delicious, with the tropical flavors of banana and coconut shining through. And even though it had dark rum in the batter and frosting, it wasn’t at all boozy tasting.

This is another celebration cake: one that’s simple enough to make for any gathering, but impressive enough to commemorate those special occasions.

Raspberry Cream Cake {ModBak}

In last week’s Modern Baker Mondays post, I recounted my first successful attempt at making a classic génoise.

And I promised that if you came back this week, you’d see what became of this wonderful cake layer. Obviously, a cake this beautiful had to be destined for something equally stunning. So I used it to make this show-stopping raspberry cream cake.

This is a special cake for a special occasion. Who wouldn’t feel great about being presented with a cake like this for a birthday or anniversary? It’s just enough work to make it a cake worth saving for a special occasion; but not so much that you should be intimidated about making it. In fact, once you have your génoise prepared, most of the work is behind you.

This cake derives its raspberry flavor from three components: raspberry moistening syrup (which is just a simple syrup with a little framboise stirred into it), seedless raspberry jam, and raspberry buttercream.

This is a classic buttercream with a raspberry purée (seeded raspberries cooked down to a jelly-like consistency) and more framboise added to it. Once you’ve made the génoise, syrup, and buttercream, it’s just a matter of assembling the cake.

I began by cutting the génoise into three layers.

I inverted the top layer onto a tart pan bottom, then brushed it with the raspberry syrup.

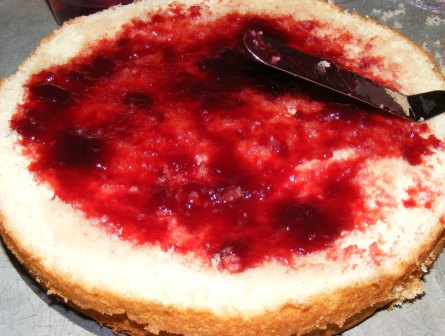
I spread some raspberry jam on the layer.

Then I topped it with buttercream.

I repeated these steps with the second layer, then inverted what had originally been the bottom layer on top.

I finished the cake with buttercream, then pressed sliced almonds on the sides of the cake. Finally, I topped everything with some sugared black raspberries.

This cake was amazing! The génoise was light and airy, and the raspberry flavor permeated the entire cake yet was somehow delicate and almost understated. We enjoyed this cake for dessert the day it was made and over the next several days, as it held up really well.

This is definitely not a weeknight cake, but it’s not so complex that you should be afraid to try it. The “wow” factor definitely exceeds the amount of work it takes to make, making this a great cake for any special occasion.

Classic Génoise {ModBak}

The next cake in the line up for the Modern Baker Challenge is one I’ve only made one other time, with disastrous results.

Last June I made — or tried to make — a French Strawberry Cake for Tuesdays with Dorie. There was a lot of chatter on the TWD site at the time about Dorie’s recipe not being a true génoise because the eggs weren’t heated prior to being whipped. Having never made a génoise at the time, all the talk just struck me as people’s opinions about what a “real” génoise should be. I just followed Dorie’s recipe and trusted that everything would work out right.

It didn’t. You can check out the French Strawberry Cake post to see just how wrong things went. Suffice it to say, after that experience, I wasn’t looking forward to making another génoise anytime soon.

I needn’t have worried. Like nearly all of Nick’s recipes, this one is clear, precise, easy to follow, and foolproof.

I began by combining eggs, egg yolks (Nick uses extra yolks to add tenderness, moisture, and stability to the batter), vanilla, salt, and sugar in a mixing bowl. I set the bowl over a pan of simmering water and heated it until the mixture was lukewarm.

I beat the egg and sugar mixture with the whisk attachment on my mixer for about five minutes, until it was light, fluffy, and had more than tripled in volume.

The recipe calls for a fairly small amount of flour, which is mixed with cornstarch, sifted over the egg foam, and then mixed in gently in three additions.

Unlike my previous experience, folding in the flour didn’t cause the foam to collapse, and I was able to get all the flour mixed in.

I scraped the mixture into a buttered 9-inch springform pan.

You’ll notice that there is batter around the edge of the pan. The instructions say to tip the pan and rotate it so that the batter runs to the top all the way around the inside of the pan. This is supposed to make the cake bake flat on the top, rather than doming in the center. Since my previous génoise baked up lopsided (before collapsing), I was hopeful that this trick would work.

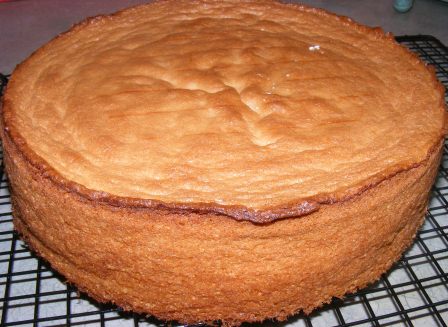
I baked the cake at 350°F for about 30 minutes, until it was golden brown and firm in the center. It came out of the oven looking really nice, and I held my breath as I unmolded it. When it didn’t collapse, I put it on a rack to cool, anxious to see what I would end up with. Half an hour later, here’s what it looked like:

If you own a copy of The Modern Baker, turn to page 241 and note the similarity between this cake and the one pictured there. Mine came out almost exactly like the one in the book!

The layer was light but firm. And to my surprise and delight, it rose high enough to be cut into three layers.

Check out this post to see what I used the layers for, but suffice it to say, this cake was wonderful — light, delicate, and very flavorful.

Thanks to Nick I now not only know what a classic génoise is supposed to look and taste like, I also know how to make a perfect one!

Guinness Stout Ice Cream {Recipe} {Ice Cream Week}

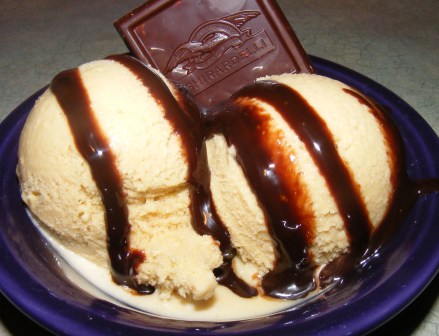
It’s the last day of Ice Cream Week, and what better way to finish than with a deliciously decadent stout ice cream? The malty, slightly bitter flavor of the Guinness pairs well with the sweet, rich custard. This ice cream is especially good with chocolate syrup.

This recipe is based on one from Saveur.com.

Guinness Stout Ice Cream

Ingredients

  • 3/4 cup granulated sugar
  • 1/2 teaspoon Kosher salt
  • 6 large egg yolks
  • 1 1/2 cups heavy cream
  • 1/2 cup half-and-half
  • 1 bottle Guinness stout, chilled
  • 1 teaspoon vanilla extract
  • chocolate syrup (optional)

Directions

  1. Whisk sugar, salt, and egg yolks in heavy saucepan until thick and lemon colored.
  2. Stir in cream and half-and-half. Heat mixture over medium-high heat, stirring constantly, until it thickens, about 6-8 minutes.
  3. Pour mixture through a fine-mesh strainer into a bowl. Stir in Guinness and vanilla.
  4. Cover and refrigerate ice cream base for at least 4 hours or overnight, then process in ice cream maker per manufacturer’s instructions. If desired, add chocolate syrup near the end of the churning cycle to create a chocolate swirl.
  5. Freeze for several hours before serving. The alcohol in the stout will keep the ice cream from freezing as solid as other custards.

Makes about 1 quart

It should be no surprise to anyone who knows me that I would make Guinness ice cream. Any more than it shocked me to read that Margaret had figured out how to make Tea and Biscuit Ice Cream. Or that Rebecca found a way to work baklava into ice cream. And Di made Chocolate Cookie Dough Ice Cream. Can you tell she has kids?

I hope you’ve enjoyed Ice Cream Week as much as I have. Let me know if you try any of the recipes and what you think. And I’d love to hear about your favorite ice cream recipes, too!

Basil Honey Frozen Yogurt {Recipe} {Ice Cream Week}

It’s day two of Ice Cream Week, and today I’m featuring an original recipe for frozen yogurt. About this time of year, I’m always trying to come up with ideas to use fresh basil. With the hot weather we’ve been having, my basil plants are growing like gangbusters, and I like to use it in different ways (one can only eat and freeze so much pesto).

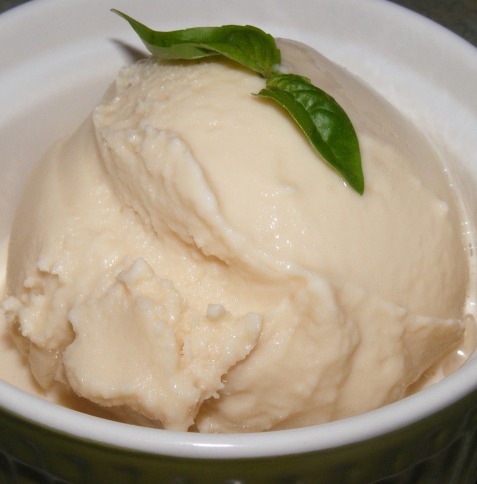
So I decided to try adding it to frozen yogurt. I used a combination of sweet and cinnamon basil, but you can use whatever kind you have. I might try it with a bit of Thai basil next time.

The flavors of honey and basil complement each other beautifully. This is sure to be a frequent repeat around here.

Basil Honey Frozen Yogurt

Ingredients

  • About 2 cups fresh basil leaves
  • 1/2 cup honey
  • 1/2 cup granulated sugar
  • 3 cups plain Greek yogurt
  • 1 teaspoon vanilla extract
  • 1 tablespoon lemon juice

Directions

  1. Wash the basil leaves, then blot dry with a kitchen towel or paper towels.
  2. Chop basil leaves (a rough chop is fine) and place in small saucepan with honey and granulated sugar. Heat until sugar melts and the mixture just begins to boil, then remove from heat, cover, and let steep for 20 minutes.
  3. Mix yogurt, vanilla, and lemon juice in medium bowl. Strain honey mixture through fine mesh strainer into bowl with yogurt. Mix well.
  4. Chill yogurt mixture for several hours or overnight, then churn in ice cream maker according to manufacturer’s instructions. Eat soft or freeze for a few hours to harden.

Makes about 1 quart

On tap for tomorrow: Frozen Wine Slushy

And be sure to check out:

Citrus Beet Ice Cream {Recipe} {Ice Cream Week}

It’s Ice Cream Week here at Of Cabbages and King Cakes! Five days devoted to everyone’s favorite summer treat. Today’s theme is “Fruits of the Summer”, which I have loosely interpreted to include one of my favorite farmer’s market finds: red beets.

This is a really easy recipe to put together. Roasting the beets is the most time-consuming part, and it’s mostly hands off. After trimming and cleaning the beets, you wrap them in foil and roast them until tender.

The most striking thing about this recipe is the color: it’s this amazing, not-at-all-natural-looking fuchsia.

And as for the ice cream itself…

It was surprisingly good, especially with a little chocolate syrup. The beet flavor really came through and, combined with the citrus, made this ice cream both bright and earthy.

Citrus Beet Ice Cream

Ingredients

  • 4 medium red beets
  • 1 medium orange
  • 1/4 cup orange juice
  • 1 cup sour cream
  • 3/4 cup granulated sugar
  • 1/2 cup half-and-half

Directions

  1. Preheat oven to 375°F. Trim stems and roots from beets. Wash beets and pat dry with paper towel. Wrap beets in heavy duty aluminum foil and roast directly on center rack in oven for 1 hour and 20 minutes. Carefully remove foil package from oven. Squeeze beets. They should give a bit but still be somewhat firm. If necessary, return beets to oven and roast until done.
  2. Unwrap beets and allow to cool until cool enough to handle. Rub beets to remove skins, then dice beets and place in food processor.
  3. Zest the orange and add to food processor. Juice orange and add this, along with 1/4 cup additional orange juice, to food processor. Process mixture until smooth.
  4. Add sour cream, sugar, and half-and-half and process until smooth and completely combined.
  5. Press base through a fine mesh sieve into medium bowl. Cover bowl and refrigerate until well chilled, preferably overnight.
  6. Process base in ice cream maker according to manufacturer’s instructions.
  7. Serve with drizzle of chocolate syrup.

Makes about 1 quart

I know it sounds like an odd combination, but it’s worth making, if only for the color.

Here’s what’s on tap for the rest of the week (links will go live on the scheduled day):

And be sure to check out the other posts for today’s theme:

Orange-scented Olive Oil Cake {ModBak}

This week’s Modern Baker Challenge recipe from the Cakes section is one of those “but for” recipes. But for the Challenge, I would never have made this cake. As much as I love The Modern Baker and most of Nick Malgieri’s recipes, this one just didn’t jump out at me as one I had to try.

And there’s one simple reason I would have skipped this recipe:

Yes, folks, that’s 1 1/2 cups of olive oil. Like Margaret, the official Challenge blogger for this recipe, I was afraid that the olive oil would dominate the flavor of this cake and make it heavy, not to mention oily. But, like Margaret, I made it anyway.

And, like Margaret, I was pleasantly surprised.

Other than an obscene amount of olive oil, this cake contains orange zest, eggs, sugar, milk, all-purpose flour, baking powder, baking soda, and salt. The orange zest — from 3 navel oranges — is the predominant flavor in this cake.

It’s not exactly light, but it’s not heavy or oily tasting, either. As Margaret notes, it would be a good cake to serve at the end of a heavy meal, as it would stand up well to strong flavors. It was delicious plain, and would also be great served with a dollop of whipped cream and a few orange wedges.

One thing I liked about this cake was the fact that it makes 2 layers, but you serve a single layer, which means this cake could serve a crowd. Or, in my case, you end up with a cake to eat now, and another for the freezer.

So don’t fear the oil. This is really a delicious cake that is not at all heavy or greasy.

Blackberry Jam Cake {ModBak}

This week’s Modern Baker Challenge recipe is Blackberry Jam Cake, a cake that was popular in the 19th century but which is relatively unknown today. I’m not sure when or why this cake fell out of favor, but I applaud Nick Malgieri for bringing it back to the modern kitchen. This is a delicious and simple cake that, as Nick says, deserves to be better known again.

To make the batter, I began by creaming butter and sugar, then adding eggs. Next, I mixed flour, cocoa, allspice, cinnamon, and baking soda in a bowl. I then added the flour mixture and buttermilk to the butter mixture, alternating between the wet and dry ingredients. Finally, I stirred in blackberry jam, raisins, and walnuts.

I scraped the mixture into a Bundt pan that had been buttered, sprinkled with bread crumbs, and sprayed with cooking spray.

I baked the cake for about an hour, until it was firm, well risen, and baked through.

We ate this cake plain, and it really didn’t need any accompaniment. If you wanted to dress it up, a few sugared blackberries would be really nice.

This cake was delicious — the blackberry jam infused the cake with a sweet, rich flavor without being overpowering. And the cocoa added depth and color to the cake. The spices lent a warmth to the cake that made it seem like it would be perfect for late fall or winter, although we enjoyed it in the heat of summer, too.

This is a wonderful cake that I will be sure to make again when the heat of this crazy summer breaks and the leaves start to turn. In fact, it might just make an appearance at Thanksgiving this year.

This recipe and post are part of the Cakes section of the Modern Baker Challenge. Margaret was the official blogger for this recipe. Check out her blog to see how she liked it.

Lemon Ginger Pound Cake {ModBak}

It’s day five of Strawberry Week here at Of Cabbages & King Cakes. And today’s theme is a simple one — strawberries make everything better.

Case in point:

This is Lemon Ginger Pound Cake from the Cakes section of the Modern Baker Challenge. In the recipe notes, Nick Malgieri states that this cake needs no accompaniment. And he’s right. It’s a great cake on its own. But with height-of-the-season strawberries and freshly whipped cream, it’s sublime.

This is the second recipe in the Cakes section of The Modern Baker. After starting this section with the delicious but fussy Perfect Pound Cake, I was looking forward to trying this simple, quick recipe. Other than grating lemon zest and ginger (I used pregrated ginger), this cake takes almost no time to throw together.

This cake is baked in a bundt pan, which is buttered, dusted with fine bread crumbs, and then sprayed with cooking spray. The bread crumbs seem like a strange addition, but they bake into the cake without a trace.

To mix the batter, I began by combining flour, sugar, baking powder, and salt in the bowl of my stand mixer. I added butter and beat it with the paddle attachment until it formed a heavy paste. Then I added the remaining ingredients: eggs, egg yolks, milk, lemon zest and juice, and ginger, and beat the batter until it was light and fluffy.

I scraped the batter into the prepared pan and smoothed the top.

I baked the pound cake at 325°F for about 50 minutes, until it was firm, golden, and baked throughout. After cooling the cake in the pan for five minutes, I turned it out onto a rack to finish cooling.

I dusted the top of the cake with powdered sugar and served it for dessert. The lemon and ginger combined to give this pound cake a wonderful flavor.

We ate it plain the first night and really enjoyed it. But when we topped it with strawberries and whipped cream the next evening, we realized we had really hit on something.

Check out the other Strawberry Week entries, starting with Monday’s Real Strawberry Shortcakes.

Man, I can’t wait until strawberry season next year.

« Older entries